
Thursday, April 21, 2016
Sunday, April 17, 2016
More spring planting and miscelleous chores
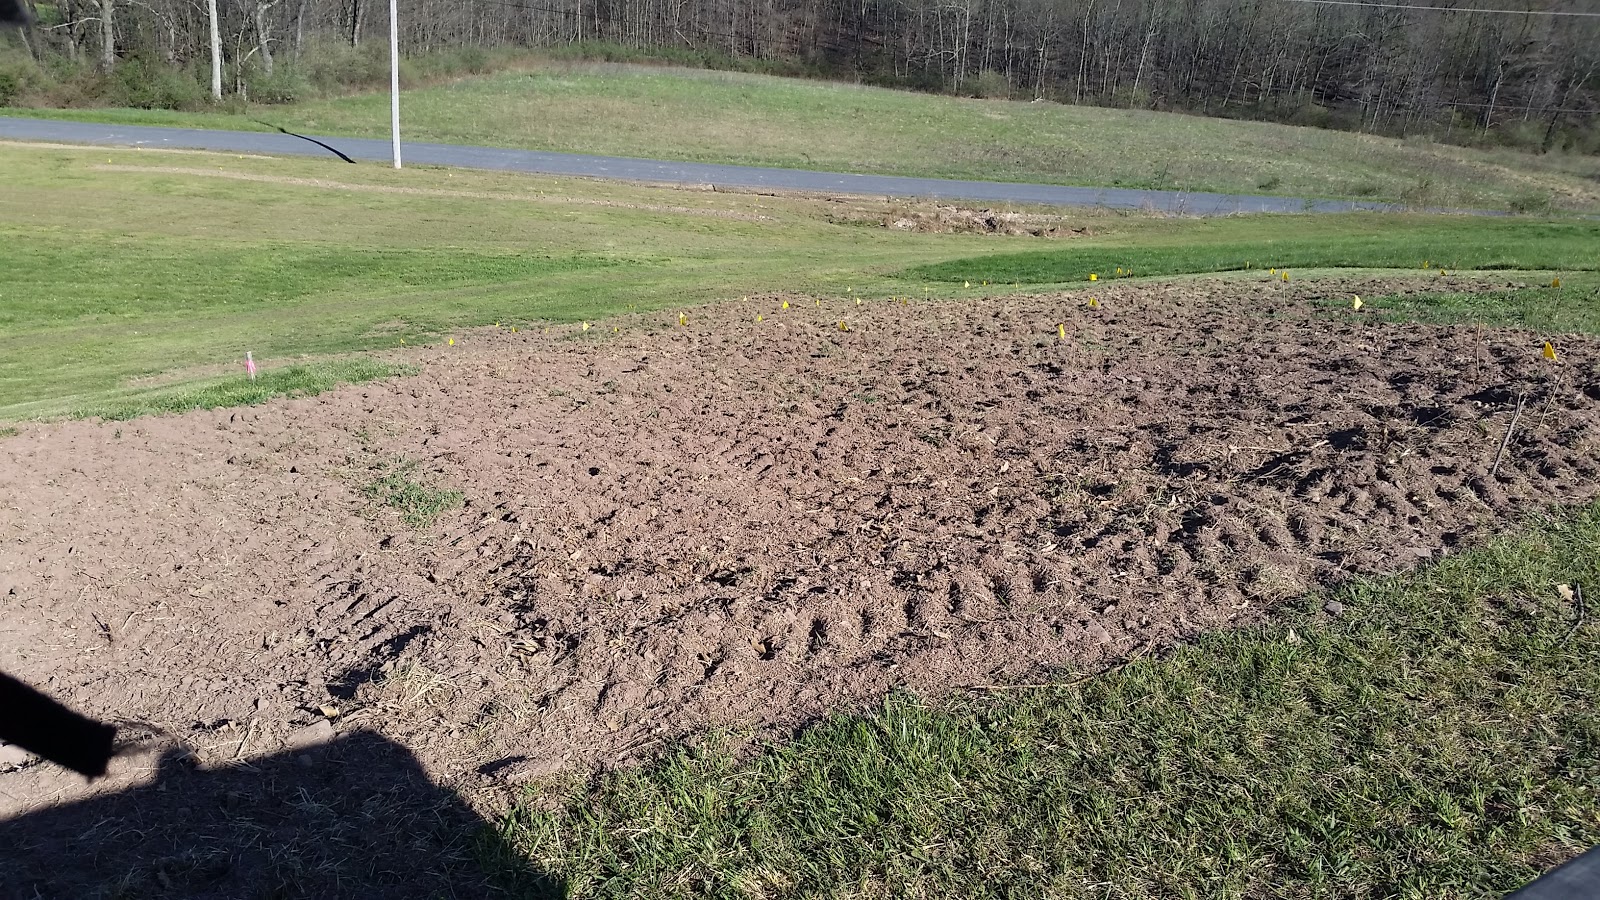
Bought and planted onion sets
Stopped by local hardware store (Ridgeline, in Hustontown) and got some surveyors flags to mark the new trees and saw that they had some seeds and onion sets for sale. We picked up a 1 pound bag of "Stuttgart" onions which I planted in about 2 and 3/4 rows in the front patch (1/4 of a row was used for Daikon Radishes). The 2 rows next to the fence were supposed to have strawberries in them, but as best I can figure they must have froze out. They were mounded and I didn't put any insulating mulch over them for the winter, which evidently you are supposed to do! Anyway, the two rows nearest the road now have onions, then there is a row of strawberries and then another full row of onions. The partial row is nearest the road.

 |
| I added a bit more black plastic to the end of the onion and strawberry rows. I could also put another piece close to the patch entrance (lower right in picture). |
 |
| This garden is fully planted now! I hope we get some rain soon - its so dry! |
Installed more flat electric fence
I mowed the orchard (the grass was already too tall! UGH) and put up the new flat electric fence. I hope this is more effective against the deer! I turned the fence on but I did not bait it. There is a herd of deer (15-20 - as best I can tell) now that hangs out in far back end of my property. They evidently do wander over to the front sometimes though because I see their hoof prints every where!
 |
| Look closely and you can see the flat fence! |
 |
| It goes all the way around the garden, the elderberries and the grapes and orchard. |
Barbed-wire fence is ALL down!!
I pushed hard and got all of the barbed wire fence down this weekend! I figured that this would be the last weekend I could do it before the snake, bees and weeds made the task very tough! It was bad enough as it was due to the large number of trees and bushes that were in this section of fencing.
 |
| No fence! No shrubs or trees! The top of the hill is CLEAN! |
 |
| Whew. It was a lot of work. Many trees and shrubs needed pulling. I tried mowing off as much of the shrubs as I could but it was very hard on the mower (I used the cub cadet). Ended up dislodging a governor spring and that took me some time to reattach. |
 |
| I think I will plant pine trees in here... |
 |
| These are the black walnut trees. |
 |
| There used to be a fence line here with trees and shrubs. |
 |
| Now just a clear shot down to the road! |
Cleaned up a fallen tree.
A tree that came down last weekend crushed some of the fence at the corner of the sheep pasture. The sheep pasture was essentially open (the sheep haven't been out yet this year). I removed the tree and saved the wood. Then I went and tried to seal up the pasture as best I could. I think it will hold sheep!
 |
| Some of the wood looks like it might be millable! |
 |
| Cleaned up that section of barbed wire fence too! |
Put up some tree-marker flags
I used the surveyor flags I got at the hardware store to mark the new locust and elderberry plantings. I noticed that the deer seem to have already knocked a few of the flags down by stomping on them! GRRR!

Gas cylinder and machine move
I brought the van up this past weekend after loading it with the propane and acetylene torch gas cylinders. I also loaded up the drill press, belt sander, and lathe. Lots of anxiety about moving those gas cylinders, but I think they are in OK shape. I will have to figure out what to do to refill the acetylene and oxygen. The machines were a pain in the ass to move, of course, and they are obviously not in their final locations - but they are out of my shop in the city! I really need to figure out what to do about the machine tools versus wood working tools in my shop. Build another shop? Add an extension onto this shop?
 |
| The machine tools in the shop - not final locations - just out of the van! |
 |
| I need to get that maple out of the shop too.. |
 |
| One of these is almost empty I think - the other feels like it might be 2/3rd full! Not light or easy to handle by any means. they should last longer inside out of the weather though. They have been sitting outside on the soil for year! |
 |
| Acetylene always frightens me! I don't know how much is left in these cylinders. I need to cut off a grounding rod out by the paw-paw garden with the oxy-acetylene torch - I hope I have enough gas for that! |
Spindle-protector threading fail!
I got out to the shop a little this weekend (at night) and checked the threading I tried last weekend. The inside diameter of this piece looked off to me, so I checked it. Sure enough the inside diameter was 2.48" (or something WAY bigger than 2.25" - which would have still be too big), The ID should have been around 2.14" allowing for a 0.1083" thread depth. I immediately checked the possible thread depth of my threading tool and found that it would NEVER be able to cut a 8 TPI thread! The cutter tip does not protruse that far from the holder! The thing that pisses me off is that I actually wondered about that BEFORE I used it! Why didn't I check then? Lesson learned! Thread cutter insert bits are thread pitch specific!
After learning this I looked more closely at the sales catalogs and many (if not most) specify the thread pitch range specifications. I got this set off of ebay and it didn't have the full specs - just said "16ER" insert. After further research (a good thing to do BEFORE you buy something! - d'oh) I found that 16ER inserts are meant for EXTERNAL threading. Which is weird since these came with an internal threading tool bar... Maybe I am being too hard on myself? The packaging was certainly misleading and should have at least indicated a thread pitch range! Also, I found that "16ER" is not enough to specify the dimensions and purpose of the insert! "16ER" simply means that it has a 16mm (16) cutting edge, external threading (E), right hand cutting (R). "16ER" does not tell you the the thread PITCH! 16NR is meant for internal threading. I finally found some information online that the insert I need is a 16NR-AG60 or 16NR-G60 is the insert I needed. I just ordered a 2-pack of 16NR-AG60-A (CP500) for $25. They are not cheap - but they look more promising then the ones I have.
 |
| Well, at least I don't have to worry about filling that defect now! |
 |
| I thought that it was taking WAY to long to cut these threads! Removing an extra 1/8 inch in addition to the thread would explain that! |
 |
| Cut is ugly and rough. |
Sunday, April 10, 2016
Trees have arrived! Last spring Snow?
Spring tree order arrived
Anyway, I got right to work and planted the cherry trees where the old ones had died.
 |
| One of the 3 sour cherry trees I planted (well, I replaced 3 dead ones) |
Then I planted the 50 strawberry plants in the front patch. Somehow I didn't get a picture of that.. I put them in a row next to the old strawberries. I had intended to plant 2 rows but evidently I planted them closer together then I did last year? Well, I have one empty row left in the front patch now - I think I will put onions there.
Next up was to plant the elderberries. I started by tilling the soil where the big patch used to be. Then I put in the elderberries between the "new" big patch" and the existing elderberry plot. Then I extended the rows to even things up on the grass side of the existing patch. All that used up only 50 of the plants. I also planted grass seed where the garden used to be. This should be all green with grass by the summer.


 |
| Definitely need to put up my electric fence though - deer have been nibbling on the fresh elderberry sprouts. |
I decided to take down the rest of the road-side barbed wire fence and plant the elderberry plants down near the sheep!
 |
| See the white flakey things? That's snow! |
 |
| One row in! That's 25 down...25 to go. But not tonight - snows coming down too hard, its cold and windy and I am DONE |

 |
| Spring? What happened? |
Fortunately, early predictions of 1-3 inches were WRONG - thanks goodness! Things warmed up and work continued.
 |
| After digging in the sod for the first row of elderberry plants, i decided that I would till that sod for the next row! |
 |
| Planting in tilled sod is MUCH easier! Way faster too! All 50 elderberries in! |
Now for the locust trees! I decided to remove some more of the barbed wire fence at the top of the hill. I want to remove it all, but time was running short!
 |
| Looking out toward the sheep pens from the top of the hill - there used to be fence here - and shrubs, rose bushes, trees... |
 |
| Looking toward the mountain from the top of the hill (standing about where the corner of the fence used to be). That piece of fencing you see there is the LAST! |
After I removed the fence, I tilled to break up the dirt and roots and even things out. Then I tilled a section where I wanted to plant the remaining locust trees. Ohm forgot to mention that about 9 of the 50 locust tress went to replace ones that had died from last years bunch.
 |
| I figured to put the remaining trees on the steep section of the hill. Once these trees get big enough I don't plan on mowing around them! |


 |
| Just a shot to put things in perspective. Those are the black walnut trees on the lower right. |
 |
| The trees are in! You can't see them very well here - but they are there! |

Other things

 |
| I couldn't drag this thing with my tractor - combination of wet soil, no traction and a much bigger tree than first thought! I will have to go back with a chain saw later. |
Tool post grinder
I finally set up my new tool post grinder and did some measuring. I also figured out how to adjust it for height - very cool! The t-nut for the toolpost fits perfectly! Better then the toolpost does in fact!
 |
| I set it up and turned it on - it runs! |
 |
| I only have 2x #2 and a #4 pulley |
 |
| Inside diameter of the pulleys is .5 inches |
 |
| A number 2 pulley - I found two pulleys marked number 2... |
 |
| The reverse threaded end of the motor spindle. |
 |
| One #2 is 1.214 inches in diameter |
 |
| The other #2 is 1.272 inches in diameter! |
 |
| I will need to get a spanner to remove this spindle - if I ever want to. Teeth need to be 1.153" apart |
 |
| With teeth 0.138" in diameter |
 |
| Grinding wheel spindle diameter is 0.378" (3/8") |
 |
| The larger diameter on the spindle is 0.635" (5/8") |
 |
| The belt is about 22" Its a flat belt. Not sure what to replace this with. |
Spindle thread protector - more work
 |
| Brought the ID to 2.121" (just a number between the min of 2.11" and the max of 2.14") |
 |
| Got the inside threading tool set up. |
 |
| OMG - thread takes sooo long! Still not done! Also, it looks like I have taken off too much in the ID! How did that happen? |
Suffice to say, I am gaining A LOT of experience doing this inside thread! Broke 3 thread bits, had to re-adjust the compound and cross slide 2 times (at least) because I did not allow for enough room for the compound slide to complete the cut, and I forgot to tighten the quick change tool post once! Also, the threading tool needed to be adjusted so that I could get a deep enough thread - 8 TPI is a deep thread and that bit isn't able to handle it with out being tilted in a bit... I think I will learn to cut my own threading bits for future work.
Subscribe to:
Posts (Atom)